WS-Trust is an extension of WS-Security specification. It enables applications to construct trusted SOAP message exchanges, defining a protocol to issue, renew and validate security tokens.
These security tokens represent a collection of claims, where as a claim is some statement about the client. For an example a claim can be a name, email address, some identity, etc. So in the security model defined by WS-Trust a web service will check wether an incoming message prove a set of claims that it's looking for. Otherwise the service will ignore or reject the message.
Here the service indicates its required claims in its policy as described by WS-Policy specification.
You can google WS-Trust and read on it more to get a clear picture.
Here I am going to explain about the Security Token Service of WSO2 Identity Server which is based on WS-Trust specification and I will explain how to configure the Identity Server to issue security tokens.
So in the security model that I have explained above there are three parties; the service provider(relying party), the service consumer and the secure token service (STS). So in this example we will use WSO2 Identity Server as the secure token service and the default echo service deployed in the WSO2 Application Server as the Service Provider and the STS Sample Client of the Identity Server as the service consumer. You can checkout the code of the sample client from
here.
In this setup I will be using WSO2 Identity Server 5.0.0 and WSO2 Application Server 5.2.1. You can download the binary distributions of these severs from
here.
In this security model the service provider exactly need to know that the consumer is the exact owner of the security token issued by the STS. Otherwise some third party can grab the security token and communicate with the service provider as a legal consumer. For this we need confirmation.
There are three confirmation methods
Bearer:
Relying party or the service provider simply trusts whoever brings the token
Holders of Key(HoK):
STS includes the public key of the service consumer inside the security token and signs it.
And before sending that to the service provider the service consumer also signs the request. When the service provider receives the token, it validates the STS signature and then validates the service consumer's signature with the public key embedded inside the token.
Sender Vouches:
The service consumer gets authenticated with an intermediary service. Intermediary service gets the security token from the STS and signs the request before sending it to the service provider. The service provider trusts both the intermediary and the STS, so it validates both of them
So in this case we will consider the bearer confirmation method which is the simplest.
In the first step we have to configure the service provider; and that service provider should advertise whoever wants to consume his service must contact the STS and get a security token with the required claims. This is done with WS-Policy.
In the first step we have to configure the service provider; and that service provider should advertise whoever wants to consume his service must contact the STS and get a security token with the required claims. This is done with WS-Policy.
1. Up the Application Server. Since I want to start both the Identity Server and the Application Server I changed the value of Offset at <ApplicationServerHome>/repository/conf/carbon.xml to 2. So now it's management console runs in port 9445 instead of the default port 9443.
2. Go to Main > Registry > Browse and in the Tree view tab click on system/config. In the resulting page click on Add Resource and select the service-policy.xml at the sts-client/src/main/resources in your checked out client sample code path.
The following section of this policy file defines the claims that the consumer should provide to access the service.
<sp:SupportingTokens xmlns:sp="http://schemas.xmlsoap.org/ws/2005/07/securitypolicy">
<wsp:Policy>
<sp:IssuedToken sp:IncludeToken="http://schemas.xmlsoap.org/ws/2005/07/securitypolicy/IncludeToken/AlwaysToRecipient">
<sp:Issuer>
<Address xmlns="http://www.w3.org/2005/08/addressing">
https://localhost:9443/services/wso2carbon-sts
</Address>
</sp:Issuer>
<sp:RequestSecurityTokenTemplate>
<t:TokenType xmlns:t="http://schemas.xmlsoap.org/ws/2005/02/trust">
urn:oasis:names:tc:SAML:2.0:assertion
</t:TokenType>
<t:KeyType xmlns:t="http://schemas.xmlsoap.org/ws/2005/02/trust">
http://schemas.xmlsoap.org/ws/2005/02/trust/Bearer
</t:KeyType>
<t:KeySize xmlns:t="http://schemas.xmlsoap.org/ws/2005/02/trust">256</t:KeySize>
<t:Claims Dialect="http://wso2.org/claims" xmlns:t="http://schemas.xmlsoap.org/ws/2005/02/trust" xmlns:ic="http://schemas.xmlsoap.org/ws/2005/05/identity">
<ic:ClaimType Uri="http://wso2.org/claims/givenname"/>
<ic:ClaimType Uri="http://wso2.org/claims/emailaddress"/>
</t:Claims>
</sp:RequestSecurityTokenTemplate>
<wsp:Policy>
<sp:RequireInternalReference/>
</wsp:Policy>
</sp:IssuedToken>
</wsp:Policy>
</sp:SupportingTokens>
- IssuedToken element defines that the requester must talk to an STS to obtain the token.
- IncludeToken attribute of this element is set to ../AlwaysToReceipient, which says that token must be included in each message sent from the consumer to the recipient.
- Address attribute of Issuer element defines the token issuer that the consumer must contact to request a token
- RequestSecurityTokenTemplate element specifies the structure of the token issued by the STS
- The TokenType element represents the type of the token such as UserNameToken, SAML-1.1, SAML-2.0.
- KeyType represents the type of the key desired in security token, can be either public key, symmetric key or bearer.
- Claims element defines the claims that must be included in the security token. We will request First Name and email address claims from the consumer. These claim uris are mapped in the identity server for this service provider. We will come to that later in this post.
3. Now we have to secure the echo service with this custom policy. For that Go to Main > Services and click on List. In the resulting page click Unsecured in front of listed echo service. Select Yes in Enable Security. Then in the Policy From Registry section click on Configuration Registry and select the service-policy.xml you just uploaded.

4. Now click Next. In the resulting page select Internal/everyone under User Groups and select wso2carbon.jks as the trusted keystore. Since STS is responsible for issuing tokens it should be trusted by both consumer as well as the service provider. In order to do so, the public key certificate of STS should be imported to the trusted key store defined here. Click Finish.
Now we have successfully configured the secured service provider.
Next we have to configure the Identity Server such that it will issue security tokens to access the service provider.
1. Startup the Identity Server. Go to the management console accessible at https://localhost:9443/carbon/. First we have to register the service provider.
2. Go to Main > Service Providers and click Add. Add Service Provider Name and Description and click Register.
3. In the resulting page expand Inbound Authentication Configuration and then WS-Trust Security Token Service Configuration. Click Configure. Then enter the endpoint URL of the trusted relying party. In my case it's http://localhost:9765/services/echo/
Usually, the security token is signed by STS. Thus, we need to select a certificate alias to sign the token. We will select the default wso2carbon certificate alias. Click Apply.
Next we need to apply security to STS. For that we provide UsernameToken based security so that the client must have a valid user account in the Identity Server to obtain the token.
1. Go to Main > Identity Providers and Click List. Click Resident Identity Provider. In the resulting page expand Inbound Authentication Configuration and then WS-Trust/WS-Federation (Passive) Configuration. Click Apply Security Policy.
2. Select Yes to Enable Security. Then select UsernameToken from Basic Scenarios and Click Next.
3. Select admin from the User Groups and Click Finish.
4. Now we have applied security for STS thus click Update.
Now we have to check about the user profile of the admin user who is going to authenticate to the STS.
1. Goto Configure > User and Roles > Users and click User Profile of admin.
In the resulting page we should make sure that First name and Email fields are not empty since we are using them as required claims.
2. Next go to Configure > User and Roles > Claim Management. There are several claim dialects. Click on http://wso2.org/claims
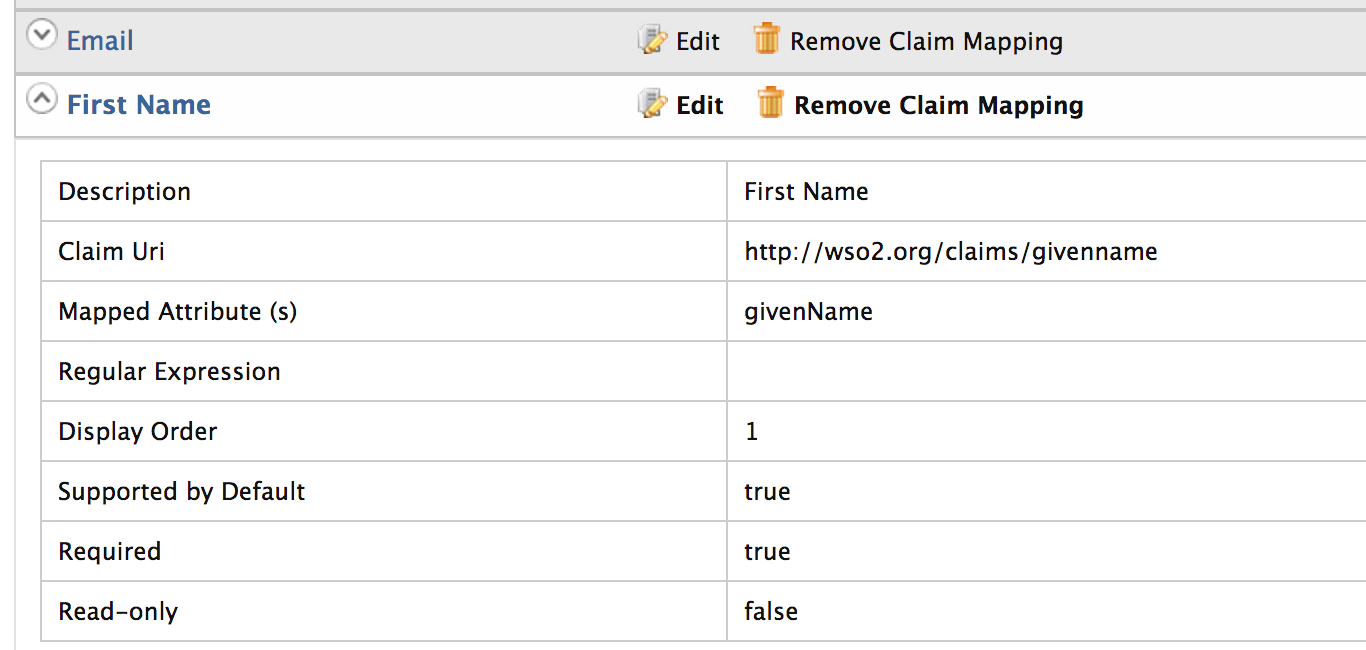
3. Expand First Name mapping. Here we can see the claim uri which is the one we gave above in the policy. Similarly we can make sure of the claim uri of email.
Now we have successfully configured the STS of Identity Server to issue secure tokens. So we can use the client consumer and access the service provider after requesting a secure token from the STS.
You can add all the jars in sts-client\lib to the classpath and run the Client. First change the address.relyingParty property at sts-client\src\main\resources\client.properties to the service provider end point. In my case it's http://localhost:9765/services/echo/. Then run the Client.
Client will generate a soap request body as below with appropriate WS-Addressing header.
<wst:RequestSecurityToken xmlns:wst="http://schemas.xmlsoap.org/ws/2005/02/trust">
<wst:RequestType>http://schemas.xmlsoap.org/ws/2005/02/trust/Issue</wst:RequestType>
<wsp:AppliesTo xmlns:wsp="http://schemas.xmlsoap.org/ws/2004/09/policy">
<wsa:EndpointReference xmlns:wsa="http://schemas.xmlsoap.org/ws/2004/08/addressing">
<wsa:Address>http://localhost:9765/services/echo/</wsa:Address>
</wsa:EndpointReference>
</wsp:AppliesTo>
<wst:Lifetime>
<wsu:Created xmlns:wsu="http://docs.oasis-open.org/wss/2004/01/oasis-200401-wss-wssecurity-utility-1.0.xsd">2014-10-12T15:14:35.023Z</wsu:Created>
<wsu:Expires xmlns:wsu="http://docs.oasis-open.org/wss/2004/01/oasis-200401-wss-wssecurity-utility-1.0.xsd">2014-10-12T15:19:35.023Z</wsu:Expires>
</wst:Lifetime>
<wst:TokenType>http://docs.oasis-open.org/wss/oasis-wss-saml-token-profile-1.1#SAMLV2.0</wst:TokenType>
<wst:KeyType>http://schemas.xmlsoap.org/ws/2005/02/trust/Bearer</wst:KeyType>
<wst:Claims xmlns:wsp="http://schemas.xmlsoap.org/ws/2005/02/trust" wsp:Dialect="http://wso2.org/claims">
<wsid:ClaimType xmlns:wsid="http://schemas.xmlsoap.org/ws/2005/05/identity" Uri="http://wso2.org/claims/givenname"></wsid:ClaimType>
<wsid:ClaimType xmlns:wsid="http://schemas.xmlsoap.org/ws/2005/05/identity" Uri="http://wso2.org/claims/emailaddress"></wsid:ClaimType>
</wst:Claims>
</wst:RequestSecurityToken>
Here the wst:RequestSecurityToken is used to request a security token from the STS which is specifically said via wst:RequestType element. So in this case we have requested a SAML2 token as specified via wst:TokenType element. We can also see that the request defines the claims that we should present to the service provider. STS will send a token for this request under wst:RequestSecurityTokenResponse element. Then the client will attach the received security token and access the service provider.
You can monitor the soap messages exchanged by enabling the SOAP Tracer in the Identity Server Monitor tab.
You can also use SOAP UI to test on this using enabling WS-Addressing in the request. For a detailed explanation of the SOAP requests and responses refer WS-Trust specification.